
Customer Signature – Capturing and printing on document template using Pen Control and Microsoft Flow
If you have a requirement where you need to capture customer’s signature, you have got multiple options to meet this requirement. You can build a fully tailored Canvas App or you can add a custom control such as Pen Control to your model-driven app and use the mobile, tablet or any other pen input enabled device for capturing signature. The next step that might come in naturally is to be able to add that signature to a (word) document template and be able to see it reflected there.
In this post, I am going to show you how you can use a Pen Control in a model-driven app driven app to capture the signature and how you can generate a document with the captured signature in it. Conceptually, it looks to be a trivial task, however, if you are wondering what is the big deal since you already know how to use a custom control and how to create a document? Please continue reading!
While I will not be going into the details of what a custom control is and how document templates are created, I will still be giving a high level overview so you don’t feel left out if you have not used these features before. Here is, precisely, what I will discuss.
Pen Control
You can add a custom control from the Controls tab in the field properties in the form designer. As of the writing of this post, you can do it only from the classic form editor. You need to consider the following when planning to use a Pen Control.
- Pen Control can be bound to a field of type Multiple lines of text
- The value of Maximum Characters for this field should be 15,000 characters at least

Once the field is created, you can add it to the form and configure it to use the Pen Control.

Important: Note that you can add a signature (or whatever Pen input data) to the control as long as it does not already have any data stored in it. While you are in edit mode, you get the options to either Clear the captured signature and make another attempt or click the small tick and confirm that the signature captured is final and preventing it from any further edits.

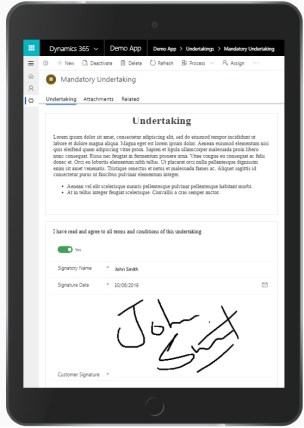
And this is how the control may appear on a mobile screen

Document Template
Following are the high level steps that you need to follow in order to create reusable document template. If you want to learn more on this topic, you can refer to the documentation here.
- Download the template
- Add any static text, pictures and necessary formatting
- Insert text fields from entity schema as plain text
- Insert Picture/Signature as Picture from entity schema as Picture
- Upload the template
The Issue
After you have uploaded the template and you generate the document, you will notice that the document generation fails as shown below.

Investigation
In order to solve this problem, we first need to understand the underlying representation of the Signature image in the Common Data Service. You can do an advanced find with the signature column included in the columns and additionally export the resulting records to see what the signature data looks like. Below is a screenshot of how it may look like.

If you have not seen this before, here is a brief explanation to help you understand. The signature/image is represented in the form of Data URL which follows a specific format. According to MDN, Data URLs are:
URLs prefixed with the
data:scheme, allow content creators to embed small files inline in documents.Data URLs are composed of four parts: a prefix (
data:), a MIME type indicating the type of data, an optionalbase64token if non-textual, and the data itself:data:[<mediatype>][;base64],<data>
The signature captured in our example can be viewed as illustrated below.
In order to fix the issue,we need to make sure that the field used to map the signature holds only the Base64 data and nothing else as shown below.

Solution
Concept
Now that we know exactly what the issue is, solving the problem is really simple. We need to remove everything before the Base64 encoded data of the signature. The end result will have only the the portion that is highlighted in green in the earlier screenshot. An important thing to note here is that we cannot overwrite the originally created signature field as it will solve the document generation problem but will not render the Pen Control properly because the Pen Control still expects the data to be stored as Data URL.
This means that the solution requires us to create another corresponding field of type ‘Multiple lines of text’ with the at least 15,000 characters at least as the Maximum limit and then use this field to store the Base64 encoded data in it. In summary, you will have one field bound to the Pen Control and the other corresponding field that will be hidden on the form but will be mapped in the document template. Make sure the 2nd field you have created always remain up to date in case there are scenarios to edit the original signature (which in my view should not be the case from data integrity point of view).
Implementation
In my case, I am going to use Microsoft Flow to implement this solution. This is probably the simplest Microsoft Flow that you may have seen as it has just one trigger and one action. You can configure the flow on Create of your entity record as well as any updates to your Signature field (in case the Signature field is not mandatory when creating the record but you capture it at some later stage in your process). In my scenario, Signature is a mandatory field when capturing the undertaking from the customer and therefore I have configured it to run only on the Create of the record.
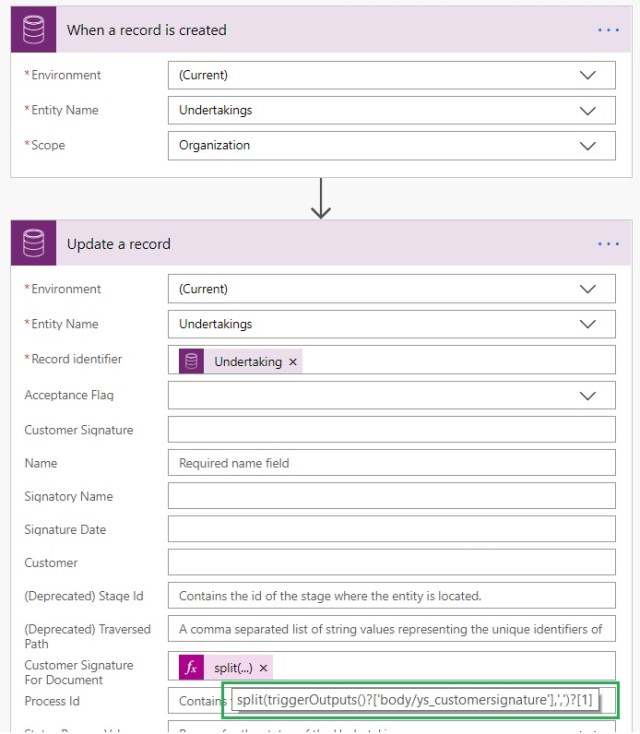
As you can see above, my ‘undertaking’ entity has a field called “Customer Signature For Document” which corresponds to the “Customer Signature” field bound to the Pen Control. Every time a new record is create, the Flow runs and extracts the Base64 part from the Data URL of the Original Signature and puts it in the corresponding field to be used by the Document Template.
The key element of this Flow is the part where the Base64 encoded data is returned. We know from the format of Data URL that the Base64 part is stored after the ‘,‘ and therefore we have used the split() function to build our expression. This function takes the source string and split character as the input and returns an array of the string after splitting it. Since the Base64 encoded data sits after the ‘,‘ I am accessing the 2nd element (at array index 1) of the resulting array. Also notice that the use of ‘?’ in my expression before the array indexer takes care of any nulls (even though in reality it will not happen as the Signature cannot be blank when creating the record in my example.
Result
With this we now have an end to end process of not only capturing the signature but also the ability to print it in the generated document as shown below. You can take this approach further by generating the document automatically every time a new record gets captured.

Note: If you want to print a checkbox as checked/unchecked conditionally to your word document (or any other control such as star rating), here is my post that talks about it.


This is very clever. Thanks for the clear explanation!
Awesome solution ! Do you have a solution using workflow on prem. Thanks.
Thanks Oleg!
Flow is not the only option to implement this but other options are slightly expensive since it involves developer. You can write custom code that saves the Base64 representation in the redundant field instead of using FLOW. You can also surface this field as hidden in the UI and use javascript to achieve the same. The important thing here is to make sure you have the Base64 string available before you extract word document.
Please let me know if it answers your question.
This is very helpful! Does this only work if you are with the customer and they sign it on your device? Would there be a way to send the form for signature or have the customer access the app to sign?
Thanks!
Thanks Ben.
The focus of this post is to make sure the format of the stored signature is such that it can be put on a word document template (which is available in Model-Driven Apps). It does not specifically talk about how you surface this to a client as there could be other ways to capture signature which do not necessarily rely on the model-driven app’s Pen Control, however, as long as you store the captured signature in the format described here, no matter how you have captured the signature, you should be able to generate a word document based document in your model driven app.
Very helpful. Can you please explain how did you get the undertaking huge text on one section? Is this a web resource/custom control?